Adventures with Wix
Wix Events Step-by-Step Setup Guide: Level Up With Wix Workflows
I’m so excited you found yourself here!
I’ve been sharing a whole bunch of helpful tips and tricks about leveraging Wix Events in your business. In this episode, we’re going to put that helpfulness into overdrive. Your business will never be same!
Welcome to Wix Workflows — the secret superpower that’ll take your business from merely good to absolutely-freaking-awesome. You’ll be completely amazed and blessed by the way workflows enable you to truly serve your customers well — with very little extra work from yourself.
So grab a coffee / tea / hot drink and let’s get into this.
Series Structure
In this tutorial series, I’ll cover everything you need to know when using the Wix Events App. You’ll learn:
- How to send out an anonymous ‘Prior Knowledge’ survey
- How to setup an event
- How to keep customers informed in the lead up to the event
- How to collect feedback from customers after the event
- How to create an optional workflow for your event, enabling you to have deep insight into your customers purchase and attendance journey at every stage
A full list of the episodes in this series at the bottom.
In This Episode
Wix Workflows are an incredibly powerful and effective way to make repetitive processes automated. They allow you to stitch together various automated and human processes into a seamless whole.
I think of them as the conductors of an orchestra
In this case, the orchestra is your business processes and workflows are what brings them together into a beautiful symphony of customer service and making money.
Here’s what we’ll achieve today:
- Tracking Customer Journey. A workflow process which tracks each customers entire Event journey. From purchase through to feedback, you’ll be able to see exactly where each of your customers are at.
- Flow on Interactions. Depending on your customers actions, you’ll be able to nudge and prompt them in the direction most beneficial for your business.
- Holistic Service. You’ll ensure that your business provides a holistic level of service to your customers.
The outcomes of what we’re doing today will be incredible. You’ll find you have:
- Service. You consistently serve your customers
- Actionable Insight. Gather actionable insight into your customers purchasing journey
- Feedback. Gather useful feedback about what customers liked about your course.
- Five Star Reviews. Increase your chances of getting the coveted five star reviews on Google Reviews and Facebook.
Ready? Then Let’s Go!
Create Parent Workflow
We’ll start by creating our parent workflow. This is the workflow through which every customer will travel as they purchase, attend and provide feedback about your event.
State Workflow Goals
Our first step is to state our workflow goals. This will help us to ensure that our workflow achieves our desired business outcome. For this workflow, we want to:
- Ensure every customers Event journey is tracked
- Manage responses to customers interactions
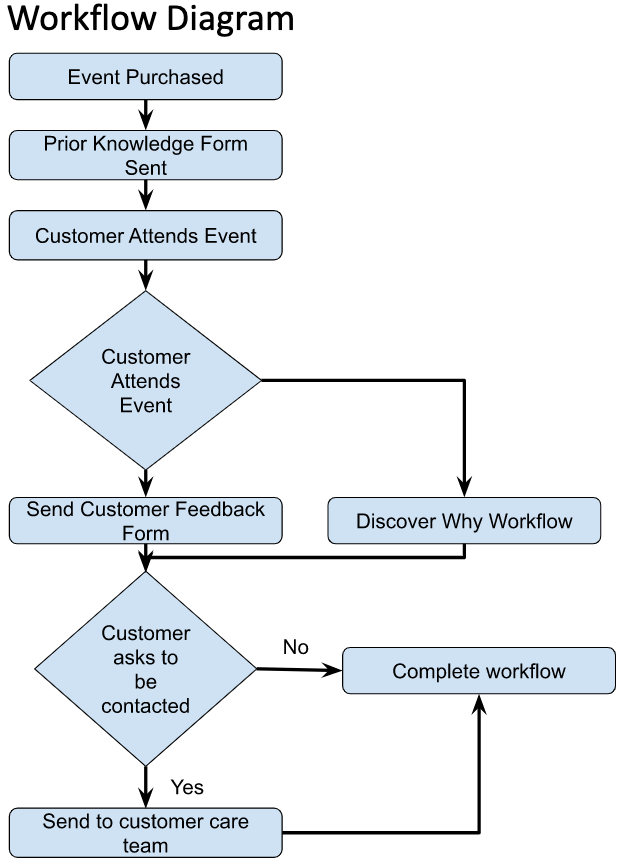
Workflow Flow Diagram
Our next step is to develop a flow diagram for our workflow. This is a visual representation of what our Workflow will achieve.
Here’s what it looks like:
If you’re wondering what software I developed this on, I used Google Docs. Is it fancy? No. However you get it included with Google Workspace, which we used in a previous episode. It is good enough for what we want, and it’ll save you money with other, fancier software. It also integrates incredibly well with Wix.
Build Parent Workflow
Our next step is to build our Workflow. To do this:
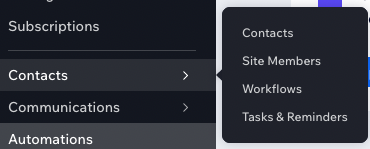
- Navigate to ‘Contacts -> Workflows’
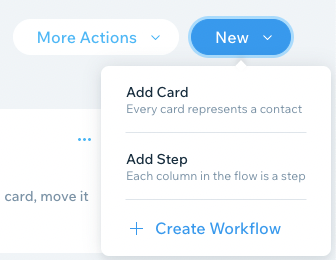
2. Select ‘New’ to create a new workflow

3. Select ‘+ Create Workflow’
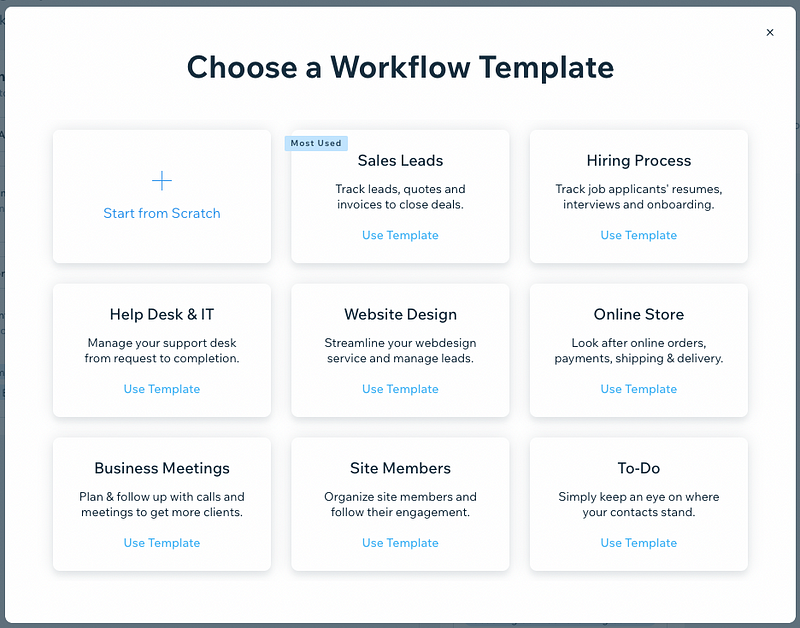
4. Choose a Workflow Template. I chose ‘Start from Scratch’
5. Title the Workflow ‘Customer Event Attendance Journey’ (or whatever you’d like 😃). You should now have a screen a bit like this:

A quick knowledge drop about workflows. Workflows have two main components: Steps and Cards. Steps are the steps to progress through a workflow — basically the steps in your process. Cards are the individual contacts within the workflow. For instance, we could have 5 steps and 100 people (contacts) going through the workflow. Using the workflow, we can see where each individual person is on your workflow journey.
This is the true power of workflows — suddenly you can see where each individual contact is on their journey. It becomes exponentially more difficult for a customer to fall through the cracks.
Let’s get back to it.
6. Add in the following steps to your workflow, using the ‘+ Add Step’ button. Ticket Purchase, Prior Knowledge Survey Sent, Event Attended, Feedback Requested Sent, Call Back Requested and Five Star Review Requested. You should end up with something like this:

Nice one. You’ve got your workflow up and running.
Connect Automations
The next stage in building our workflow is to connect our automations. This is what allows us to track and move our Cards. In this section we’ll be connecting the following:
- Adding the Card to the Workflow when a customer purchases an event ticket
- Moving the Card to along the Workflow when the Prior Knowledge survey is sent (remember it’s anonymous so we can only track the sending, not the receiving)
- Moving the Card when the customer attends the event
- Moving the Card when we send the customer is sent a feedback request
- Prompting our customer care team to call a contact if they request a call back
- Asking the customer to give us a review
- Completing the workflow
It sounds like a lot, but if you completed Episode 3, you’ve got nearly all the information you need. Building on that, let’s add that in now:
Add Card to Workflow on Purchase
- Navigate to your Automation which I called “Get to Know Us Form Automation” from Episode 3. This automation emailed a link to our standalone ‘Prior Knowledge’ form.
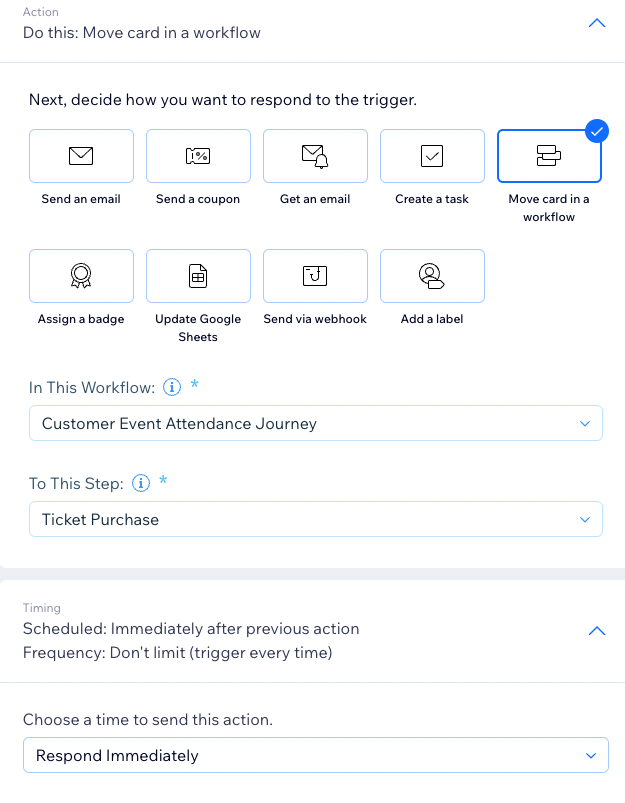
- Modify the Automation so that the first step after the event purchase is to ‘Move card in a workflow’
- Select the Workflow we just created — ‘Customer Event Attendance Journey’
- Select the step ‘Ticket Purchase’
- Update the schedule to be ‘Respond Immediately’
Move Card Once Prior Knowledge Survey Sent
Our next step in this example is very straight forward.
- If you modified your first step to move the card, add the step for the email back in.
- Now, add in a third step to ‘Move card in a workflow’
- This time, your options are as below:
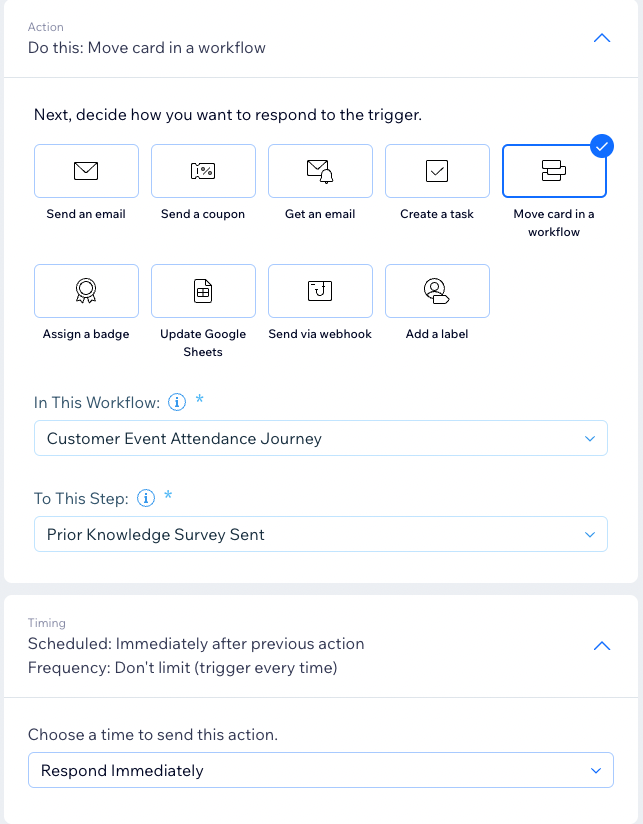
Now, for all the eagle eyed people here, yes, the first step is a bit redundant. I’ve included it for completion as it allows the workflow to make sense 😃
Move Card Once Event Attended
Unfortunately, this is another one of those area’s where Wix has a strange drop in their functionality. At the time of writing, Wix doesn’t have an easy way for us to determine who has attended an event or not. It’s a puzzling gap as the building blocks of the functionality is available with the Wix Bookings App, and event check in using QR Codes.
It can definitely be achieved by using a combination of Google Sheets and Wix Velo API’s. However, this is not an easy or trivial challenge and involves a lot of code. If this is something you definitely desire for your company, let me know using the Creative Appnologies Contact Form and we’ll see if we can help.
For now, we’ll have to accept this as a manual process and move forward.
Move Card Once Feedback Form Sent
Moving forward, we want to trigger the send of our automated email once a customer has attended the event. Specifically:
- We only want to send a feedback request IF the customer attended the event
- We want to ensure that EVERY customer who attends the event gets a Feedback Request form
To do this, we modify our trigger and response actions from the Feedback Form Automation in our CRM Basics episode. Do this:
- Change the trigger to be ‘Card Added or Moved’
- In This Workflow: Customer Event Attendance Journey
- To This Step: Event Attended
Here’s what mine looks like (yours might have ‘Save’ rather than ‘Activate’):
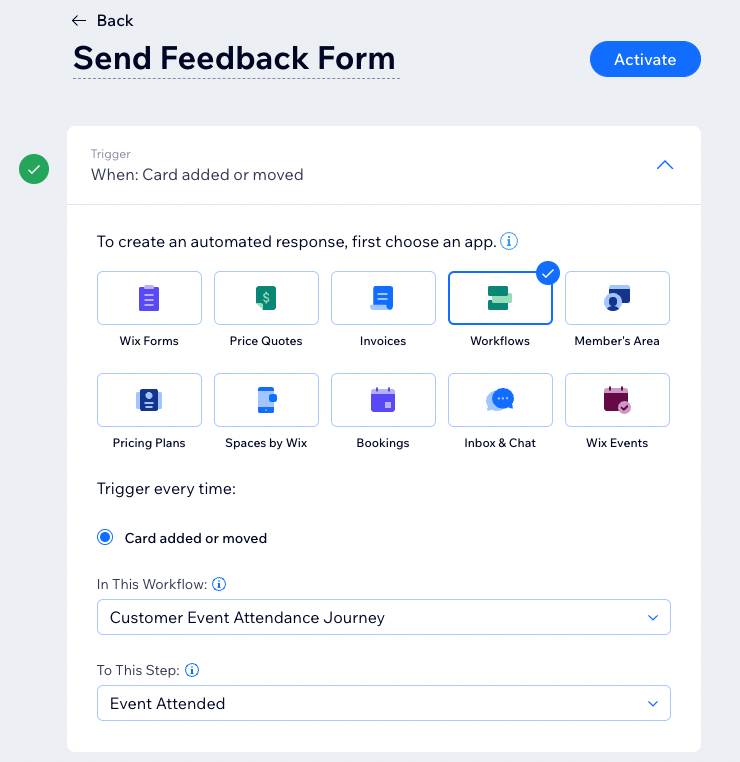
The event action of sending an email remains.
Level Up Activity. Here’s a level up activity for you. What about the customers who don’t attend the event? It might be useful to get some insight as to what prevented them, or to offer them a discount on a future event. With everything we’ve covered so far, you’ve got what you need to do this. Have a go and see how it works for you 😃
Callback Requested
As part of our Feedback Form, we offered customers an option to request a callback. How good would it be if we could automatically drop such a request into our ‘Customer Care’ team, triggering a separate workflow for them to complete?
It would mean that our customers are cared for, as well as giving us some valuable insight into where they’re at. If we do it well, it’ll really show up in our reviews, which will increase our sales!
Using our knowledge so far, this is absolutely possible. Here’s how:
- Design your ‘Customer Care’ workflow. To do this, review what you’ve learned in this episode so far.
- Update your feedback form to include contact details
- Create a new automation. Trigger: Wix Forms, Form choice selected, fill out your trigger.
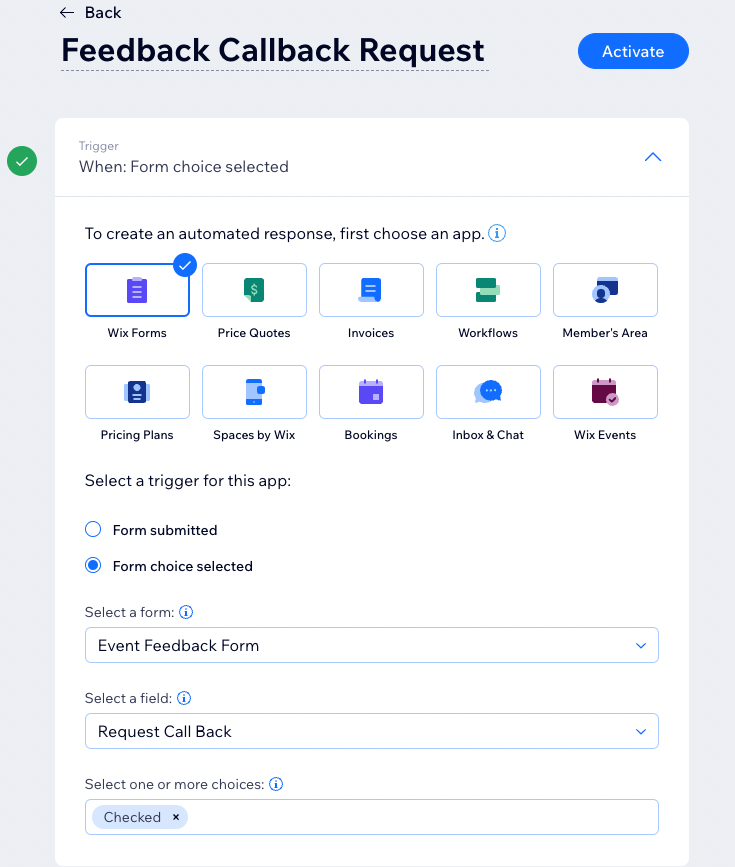
4. Action. Move card in a workflow -> your new workflow, step 1
5. Second Action. Move card in a workflow -> our current workflow, step ‘Call Back Requested’
Five Star Review Requested
I say this step a little bit tongue in cheek, as we shouldn’t be gaming the review system in any way. Not only is it against Google Reviews and Facebook Reviews terms of service, it also doesn’t help us improve our business.
What might be helpful though is to prompt people to give us a review. There’s different ways to think about this, and your approach will be dependent on a variety of factors specific to your industry.
For our example, we’re going to take the approach of ‘wait a week and then ask for feedback’. This allows us to demonstrate the concept.
For this step, we’re going to:
- Trigger the event 7 days after the event ends
You should have everything you need to do this. Simply:
- Set up a new automation to trigger on the ‘Feedback Request Sent’ step
- Set the first action to be moving the Card in the workflow with a timeframe of 7 days
- Set the second action to be sending an email, immediately after the previous action
Have a go for yourself!
Done
Our final step is to move our Cards to ‘Done’ letting us and our team know that this customer has completed their Event journey with us.
Once again, you’ve got everything you need, so have a go.
A quick tip: Have a think about how you would move your Card from ‘Call Back Requested’ to ‘Done’. Is this going to be a manual step required of your customer care team OR would it be possible to use their workflow to trigger another step in this workflow?
Your call 😃
We’re Nearly Done
Ok. I’m super excited.
Over the past 4 episodes, you’ve put in a ton of work. You’ve built an incredible Event from start to finish and even added in a complete level up for your customers. I’m truly believing that you will thrive with such a service.
In our fifth and final episode, we’re going to bring this home by publishing everything you’ve done.
See you there ❤️
List of Episodes
- Event and Feedback Setup
- Full Event Configuration
- Event CRM Basics
- Level Up with Wix Workflows
- Publishing Events on Wix Website
Follow Me
As with everything I write, I hope you find this helpful ❤️. It would mean the world to me if you took the time to give me a ‘clap’ on Medium, or subscribe to my email list. If you’re looking to subscribe to Medium, feel free to use my referral link (it doesn’t cost you any extra, but does mean I get a portion of your subscription fee).
Enjoy, and feel free to drop me a DM on twitter, connect on LinkedIn / Github with thoughts and comments 😃

