Wix Events Step-by-Step Setup Guide: Event CRM Basics
Customer Relationship Management (CRM) is everywhere. It describes our approach to managing our interactions with our customers.
Customer Relationship Management (CRM) is everywhere. It describes our approach to managing our interactions with our customers.
Customer Relationship Management (CRM) is everywhere. It describes our approach to managing our interactions with our customers.
Done well it creates a ton of value for our customers and our businesses. Our customers feel loved, cared for, informed and valued. In turn they’re willing to pay us more. Everyone wins.
Automating as much of this as possible saves you time and gives you actionable data.
That’s what this episode in our series on Wix Events is all about. You’ll be amazed how simple this is to do with the Wix Platform and I can’t wait to show you how.
This in-depth tutorial series teaches you everything you need to know to setup and publish events using the Wix Events app. You’ll learn how to:
Each episode has a full list of the episodes at the bottom and solves a particular part of the puzzle.
If you need extra help, don’t hesitate to reach out to my company Creative Appnologies. We would love to help you ❤️
In this episode, we’ll be covering some the basics of CRM’ing:
You’ll be amazed at how simple this is, so let’s jump in!
A great sign of a well thought out business is how they manage (and automate) getting information from customers.
Wix makes this very straightforward for us, using their Automations section. Using this system saves you a ton of work, as they include everything you need to get started.
Let’s go through two automations.
Our first automation is sending the Prior Knowledge Form we developed in Episode 1.
Let’s get it set up:
2. Select ‘Edit’ from the ‘Your standalone forms’ section

3. Select ‘Share’

4. Copy the link provided
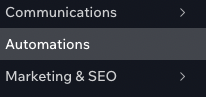
5. Navigate to ‘Automations’ from the Wix Dashboard
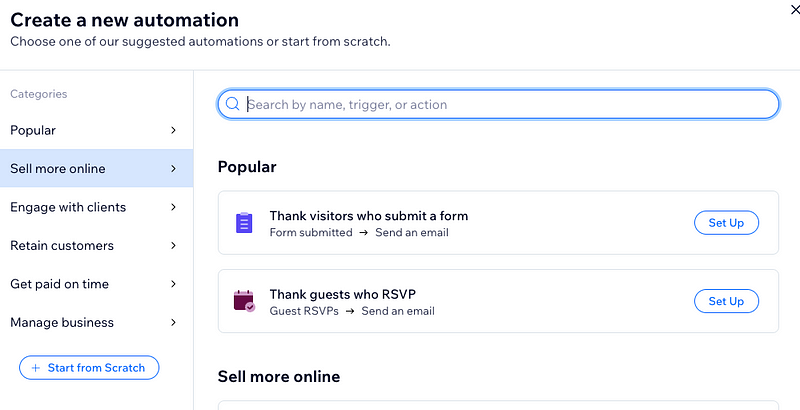
6. Choose ‘+ New Automation’

7. Choose ‘Start from Scratch’
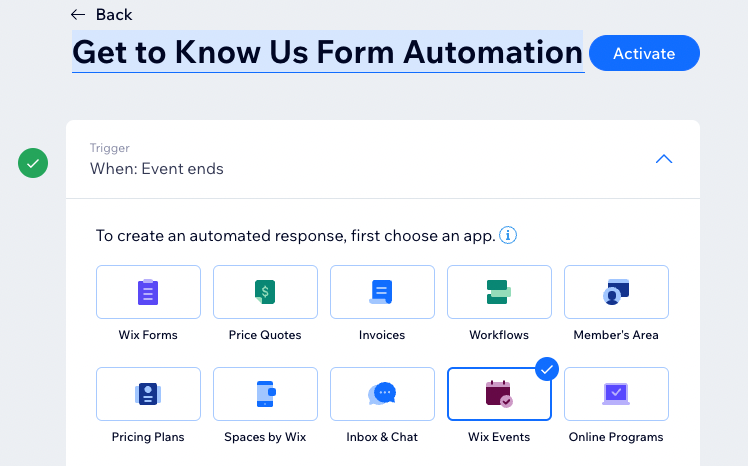
8. Name the form. I chose ‘Get to Know Us Form Automation’
9. Choose ‘Wix Events’ from the provided options
10. Choose the option ‘Guest purchases ticket’
11. Select the event which triggers the automation. Depending on your setup, this might be ‘All events on site’ or you can set it to be only the event it applies too.
12. Choose the trigger ‘Send an email’
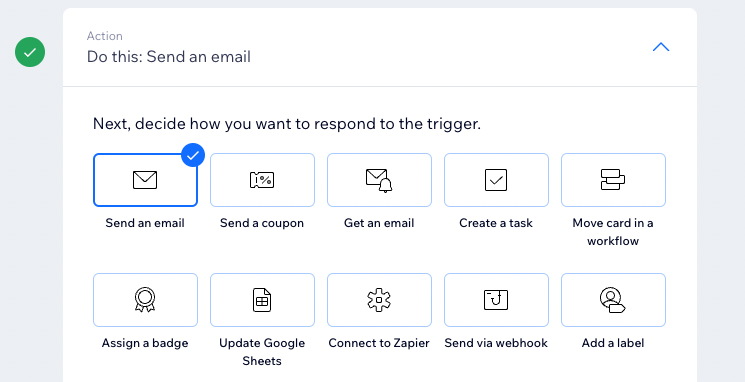
13. Choose ‘Edit Template’ for the email.
14. Edit the template to be how you like it. For instance, I updated the theme to be ‘Tech’ and added in a button for the feedback.
15. Wherever you choose to put the link, add in the link to the standalone form from step 4.

16. Choosing timing as ‘Immediately after trigger’
That’s it! All done!
You’re making some great progress so far! Now I’m going to challenge you to build the next automation using the skills we’ve just gone through.
Here’s our desired outcome:
Here’s the steps.
Design your feedback form. If you need a primer on how to do this, check out episode 1. For mine, I asked the following:
Now copy the link to that form.
Automate the sending. The options you want to choose for this automation are:
Don’t worry if it takes you a bit of time to figure this out. That’s why I wrote this tutorial 😸
Effective analysis gives incredible insight to a business. We all know this, yet the collection of data remains an annoying, time consuming task for many businesses. As a result, many business owners and leaders never get to the analysis stage.
Today, we’re going to see how we can simplify many aspects of data gathering. All you’ll need to do at the end is analyse the data! Even this part we could simplify if we wanted too — but that’s a topic for another series 😃.
By now you should have two automations completed, both containing links to standalone forms.
These standalone forms solve our first problem: Gathering Data.
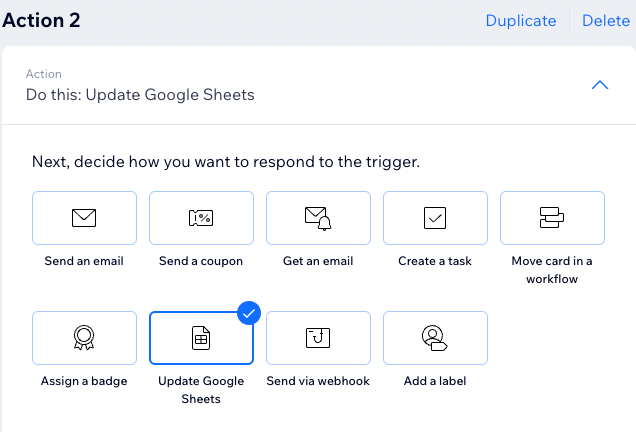
With our data gathering sorted, we now want to drop it into a spreadsheet program.
For our purposes, we’ll be using Google Sheets. Google Sheets is part of the Google Workspace, an incredibly powerful set of cloud based tools from Google. Google Workspace (which includes emails) integrates incredibly effectively into Wix and this is no different.
While not the subject of series, using the Google Workspace suite gives you access to a number of ways to level up your business intelligence toolset. Feel free to contact Creative Appnologies if you’d like to discuss it further.

3. Select the ‘Update Google Sheets’ option
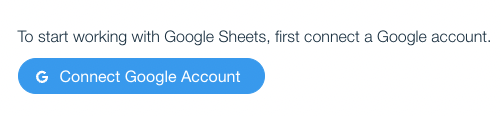
4. If required, Connect Google Account (make sure you review and are comfortable with the access it requires). If the access permissions are an issue for you, a great option is to create a service account which only access some really simple items.
5. Prepare a Google Sheet for use by Wix
6. Choose the spreadsheet and Sheet from the dropdown list
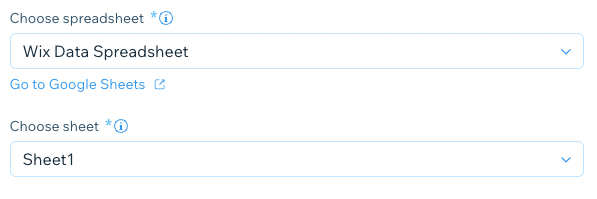
7. Match the columns to make sense to you
8. Schedule the timing to immediately
9. Now repeat this process for your feedback form
You’re all set! How good is that.
Now depending on your use case, you can get all sorts of incredible insight into your business.
Let’s continue.
Our final section is to configure our event notification emails.
I’ll be upfront here. At the time of writing I find the generic Wix Notification emails to be somewhat lacking to say the least. They’re super generic and they lack a lot of the configuration options available through automations. For instance, you can’t include your own branding. It’s a strange drop for a platform which has an excellent email template builder already available through its automations platform.
Even worse, simple things like sending reminders and cancelations are challenging to do through the dashboard. There’s definitely work arounds available, but it’s way less than ideal.
That said, the advantage of Wix lies in the incredible integration throughout the rest of the platform. It’s your call if you want to go through it.
If you want to use the built in Wix Event emails, here’s how:
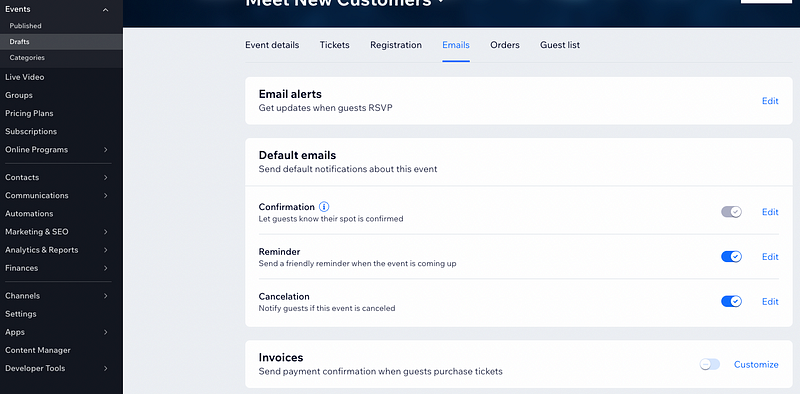
2. Now go through and update your settings.
This determines how you will get notified about people RSVP’ing. If you want to be alerted, you can choose two types of email alerts:
Which one you choose is totally up to you.
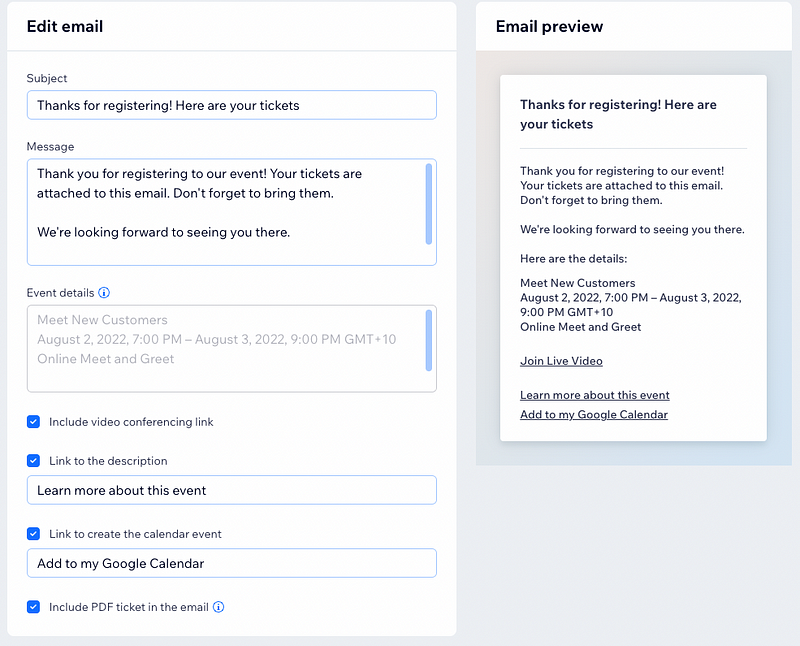
This email cannot be worked around. If you use Wix Events, you MUST use this. The good news is that it includes everything a customer needs — a link to the description, ability to add it to a Google calendar, and an included PDF link.
You can modify:
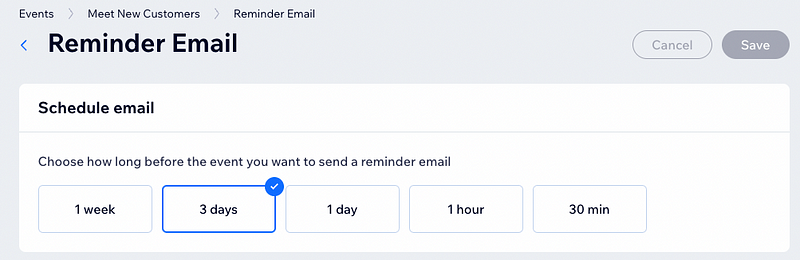
The Reminder email is pretty much the same (and you can only have one). Your options are: 1 week, 3 days, 1 day, 1 hour, 30 mins. Not sure why these are the only ones, but there you go.
Same again for the cancelation email.
This is the final one — the ability to automatically send invoices when tickets are purchased. This is very handy if you’re dealing with corporate clients, although the email is still a bit generic
And that’s a wrap (for this episode at least!)
I hope at this point you’re really getting some ideas on how you can help your customers while getting valuable insight to what they’re up too.
However, we’ve only just scratched the surface on what is possible using a few simple automations. In the next episode, building upon this one, we’re going to take this to the next level, integrating a couple of workflows to truly streamline your information loop.
You’ll be amazed at the level of insight and control you’ll have over your guests experience and as a result, your ability to serve them well! Hopefully there’s many 5 star Google Reviews in your future!
As with everything I write, I hope you find this helpful ❤️. It would mean the world to me if you took the time to give me a ‘clap’ on Medium, or subscribe to my email list. If you’re looking to subscribe to Medium, feel free to use my referral link (it doesn’t cost you any extra, but does mean I get a portion of your subscription fee).
Enjoy, and feel free to drop me a DM on twitter, connect on LinkedIn / Github with thoughts and comments 😃