AUTOMATED TRADING BOT WITH METATRADER5 AND PYTHON
Building your own Python Trading Bot can be a ton of fun. The process of building your own strategies, making trades, then letting it run in the background can be incredible.
When you get it right, it’s also profitable!
So let’s learn how to share your Trading Bot activity on Discord.
Outcome
By the end of this episode, you’ll have your own Discord server up and running and be sharing live updates of your Trading Bot activity.
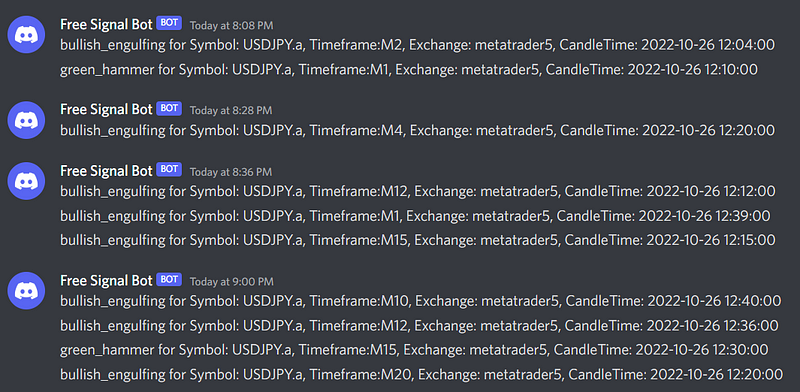
Here’s an example of one of my free channels here, with a snapshot of the current activity below:

About Discord
Discord is a great choice for creating a collaborative sharing platform for your trading bot. It offers a great range of features and easily accessible REST API allowing you to easily post messages to your channel. It is cross-platform and runs effectively in a browser if you choose.
With a couple of extra options (not covered here), you can extend Discord channel functionality to include slash commands and more.
Best of all, the free version has all the features you might want.
Create A Server
To get started, create a server in your Discord. To do this:
- Navigate to your Discord channel list
- Click the + button on the left for “Add a Server”
- Choose a template or Create My Own
- Follow the prompts
All done.
I’ve called my server Creative Appnologies.
Create a Channel
To create a channel:
- Navigate to your channel
- Choose the + sign in the TEXT CHANNELS section
- Choose a name
- Choose create
All done.
I called mine #free_indicators and you can access it here. It provides a list of signals on the USDJPY Raw foreign exchange (FOREX) pair.
Create a Webhook
The actual posting of text into your channel will be done with a webhook. Webhooks are a lightweight form of event-driven communications between two API’s — RedHat has a great write-up about them if you’d like to know more.
To create your webhook, select the gear icon from your channel, and choose ‘Edit Channel’

Now:
- Navigate to ‘Integrations’
- Choose ‘Webhooks’
- Choose ‘New Webhook’
- Name your Webhook Bot
- Upload an image if you’d like :)
- Choose “Copy Webhook URL”
Python Code
The Python code for a generic webhook send is as follows:
from discordwebhook import Discord


# Function to send a message to Discord
def send_message_to_discord(message, webhook):
    discord_send = Discord(url=webhook)
    discord_send.post(content=message)
And that’s it. Just a couple of lines of code.
- Message. This is the message to share.
- Webhook. This is the URL you copied earlier.
You can extend this function as needed. For instance, in the Discord channel I’ve shared, I undertake a couple of operations to create the correct string.
Some Recommendations
Although this functionality will get you up and running, here’s a couple of other things to check out:
- Permissions. Discord is notorious for unsafe sharing and permissions. Take some time to go through the permissions and get them suited for your needs.
- Importing the Webhook. As a general rule, sensitive items such as webhooks should not be hardcoded. In my setup, I import the webhook url from a settings file.
Say Hi!
I love hearing from my readers, so feel free to reach out. It means a ton to me when you clap for my articles or drop a friendly comment — it helps me know that my content is helping.
❤

